| Materials Clay should feel smooth when moulded and squeezed in the hand. It should not
feel lumpy or gritty. Ant-hills are usually suitable but if they are too 'rich' (that is,
the clay tends to crack) mix some sand into it but use as little as possible.
Iron brick moulds are better than wooden ones as the bricks slide
out easier. Sand should be sprinkled on them to ease the turning out.
Personnel
One skilled brick maker should turn out 1,000 bricks per day. He
needs about 7 - 10 assistants depending on proximity of water etc.
Modus operandi
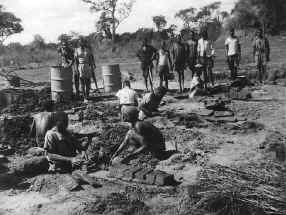
Clay should be dug and watered about a fortnight before use. It
should be well puddled with the feet in default of a pug-mill. It should be kept watered
so that the surface does not become dry. Puddling should be done on a brick floor, boards
or iron so that the full force is exerted on the clay.
Stand bricks on well prepared lines, running along a slope or on
level ground. This saves carting up hill. Stand them on edge. When drying they may be
stacked, but not too high as the weight may break some. Leave spaces between them in
stacking. When dry they may be made into a kiln. Test for dryness is to break one and test
the centre with a knife. The blade should not enter easily.
The Kiln
Lay out so that the outside is two bricks in width, then a firehole
of of two and a half bricks in width, then a pillar of three bricks in width and so on
with fireholes and pillars, ending up with an outside edge of two bricks in width.
Arches may be seven bricks high. Kiln twenty-four to twenty-six
courses in height. Width about fifteen feet. Length according to taste.
In stacking in the kiln, the outside three rows should be close
together and the rest a fingerspace apart so that heat can rise. two bricks in length
should be covered by five on edge. Fireholes should be blocked up in the centre to prevent
fire being blown through. The sides should be covered with dagga in the manner of
plastering a house. The kiln should be surrounded by a wind break to prevent firs being
blown about. After stoking with wood, holes should be closed with tins or bricks.
Firing
Wood will do. Dry wood is preferable. One cord for every thousand
bricks. Get plenty before burning begins as it is dangerous to let fires down while
burning. Keep fires up all the time. Start with small fires for about three days to drive
off all moisture; when finished, one sees no steam rising from the top of the kiln in
early morning. Then stoke up and burn hard for 48 - 60 hours until the grass held on top
between the cracks chars. Then thrown earth on top to cover top completely and block up
all fire holes with clay or bricks. Then allow to cool off; about 7 - 10 days will be
needed for this.
Images
|